
The Vendors module includes the functionalities required to manage vendors. Users can easily view or edit the existing vendors’ information and can also create new vendors or delete existing ones.
Vendors list
After opening the Vendors menu, a list with the existing vendor information is displayed on the Vendors form via the following columns:

Vendors list
- Vendor type: The first column indicates whether the vendor is a person (
 ) or a company type vendor (
 ).
). - Name: displays the name of the vendor.
- Category: displays the vendor category assigned to the vendor.
- State: displays the state where the vendor is located.
- City: displays the city where the vendor is located.
- Phone: displays the main (#1) phone number of the vendor.
- Type: displays the vendor type: Company, Person.
- Address: displays the full address of the vendor (address #1, City, State and Zip from the vendor’s profile).
- Email: displays the email address of the vendor.
- Cell phone: displays the cell phone number of the vendor.
- Contact person: displays the default contact person of the vendor.
- Account manager: displays the name of the user who created the vendor.
- Markups: displays the
 icon which can be used to bring up the ‘Vendor markups’ form where item type markups can be defined for the vendor.
 - Notes: displays the
 icon, indicating whether the vendor has any notes added to them. If there are any notes added to the vendor’s profile then the notes icon changes to:
  .
.
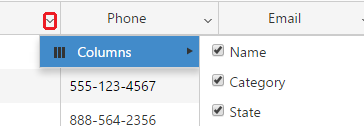
The columns’ visibility can be toggled on and off by clicking the arrow symbol from the columns headings. Unwanted columns can be deselected to no longer display them in the grid. These settings are saved and remembered upon the user’s next login session. The order of the columns is also customizable by dragging a column by its header and dropping it into its desired order. The width can also be controlled by clicking on the left or right edges of the column’s header-row and dragging it until the desired width is reached.
In the bottom-left corner of the form the number of vendors which should be shown per page can be specified. If the vendors are listed on more than one page then the pager at the bottom of the grid can be used to navigate between them.
The vendor list can be refreshed by clicking the ![]() button from above the grid’s the top-right corner.
button from above the grid’s the top-right corner.
Filters
Searching for specific vendors can be done using the expandable Filters panel from this form. Multiple filters may be used simultaneously to perform a search:

Filters panel
- Name: filters based on the vendor name. Filtering is case-insensitive and partial matches are also displayed.
- Type: filters based on the vendor type (company or person).
- Category: filters based on the vendor’s category.
- Country: filters based on the vendor’s country specified in their address.
- City: filters based on the vendor’s city specified in their address.
- Show: can be used to show only active, only inactive or all vendors.