
After you have filled the new job order’s particular information, described above, you should add item(s) to the JO. You are also able to edit, customize the selected workflow’s services.
The Items & Services section has four subtabs, which are described in detail below:
This tab is used to add items to a JO. A Job Order accepts multiple job items with different properties. The already added JO items are displayed in a grid. Beside adding item types to JO in regular way (using Add item button) you can also scan the item’s SKU.
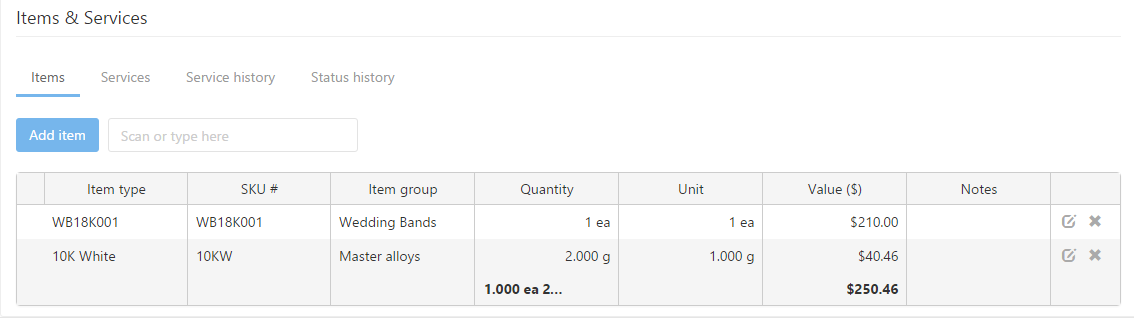
JO’s item type list
Clicking on the Add item button will open the data entry window. The following data fields are available on the Create job order item form:
- Select group: You can specify the item group, by selecting it from the item groups predefined list.
- Item type: This is the item type added to the Job order. It can be selected from a dynamic selection list (you may opt to enter a few characters, the matching item types will be listed, available for selection).
- Total Count / Total Weight: Specifies the quantity you wish to add from the selected item type. In case of e.g. Master alloys, it is Weight.
- Total amount: It displays the amount represented by all unit of the item type.
- Unit price: The field will display an automatically calculated value by adding the discount (if there is any) to the sales price of the item type, however this can be overwritten manually by the user with any custom value.
- Total price: Shows the total value of the item type, taking into consideration the price, quantity and discounts or markup.
- Fixed: If this is checked, the item type’s price will be fixed during the production process.
- Item SKU: This is the item type’s unique code.
- Item location: The item type’s location can be selected in the current field.
- Item note: Any instructions, notes that might be needed regarding the JO’s item type.
- Job memo: This is a text field for adding any memos that might be needed.
- Item description: Any description added to the JO.
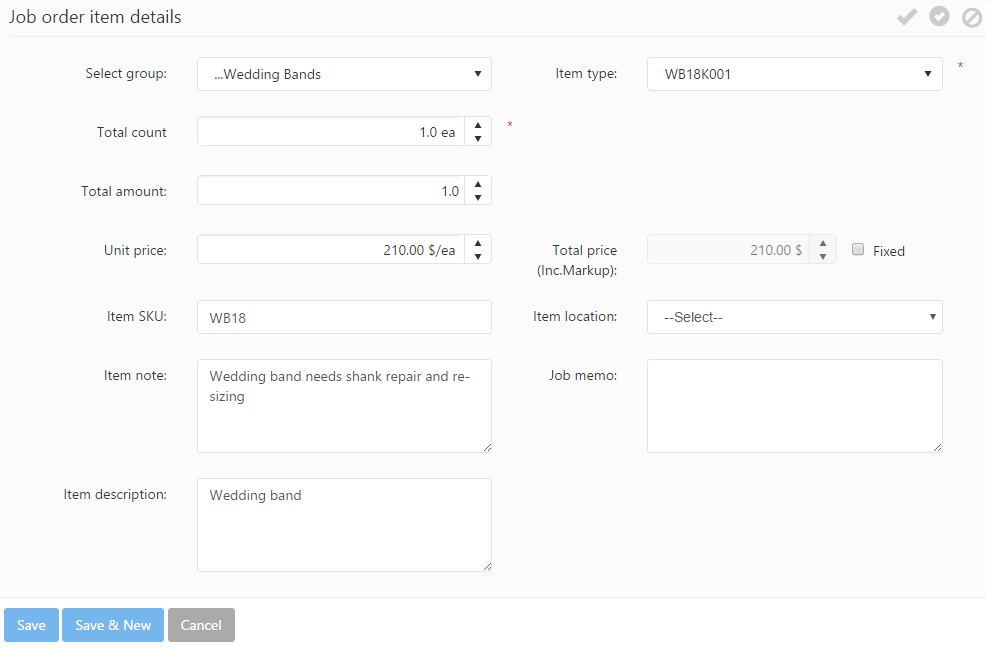
Adding new item type
If the selected item type has custom attributes, the Attributes section will appear on the Create job order item form, that allows entering or selecting these attributes.
After you have filled the form’s field you should save it using the Save button, or in case you want to add another item type to the job order use the Save & New button.
Services
The Services subtab shows the list of services required for the JO. This list is populated by default when the Workflow is selected.

JO’s workflow
Individual services can be added manually using the Add service button, edited with the ![]() icon or deleted with the
icon or deleted with the ![]() icon. The default order of services is defined in the workflow properties (set under the Workflow management). This order can be customized for the current Job Order using the Up and Down arrows. The Job Order will than follow the service order specified here in its routing process.
icon. The default order of services is defined in the workflow properties (set under the Workflow management). This order can be customized for the current Job Order using the Up and Down arrows. The Job Order will than follow the service order specified here in its routing process.
When you add a new service to the JO’s workflow, the following fields can be defined:
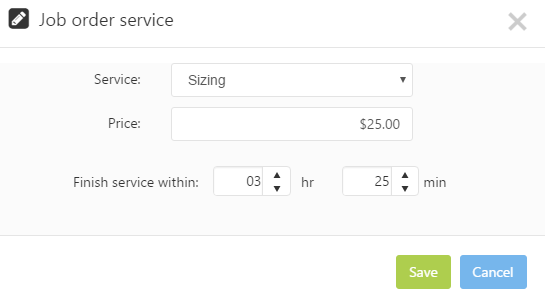
Adding service to the JO’s workflow
- Service: Select the service that you would like to add to the JO’s workflow.
- Price: Displays the flat rate for the service (as set up in administration).
- Finish service within: This is the workflow item’s due date expressed in duration; its format depends on the selected service timing, and the default values are set on the basis of the default service type settings.