
Overview
The Inventory tool allows you to maintain an exact, detailed, and real-time inventory of all items and materials used in daily production. This is a general-purpose inventory module for tracking items created via Item Types management. It also includes metal types, making metal-type-related movements visible within the general Inventory.
Inventory movements can be generated automatically based on job orders – Job orders can generate movements via services, provided the service is configured with the correct inventory handling rule for the item type’s group and the “Track item quantity” setting is enabled at the item type level – , consignments (memos), invoices and Receiving Goods (RG – if the status is set to “Received.”) documents. These movements can be detailed, searchable, and traceable. The inventory can be partitioned into manageable groups for instant visibility of current levels of specific inventory items (e.g., styles, diamonds, etc.). Additionally, automatic replenishment is managed via the Purchasing/Restock Items feature, ensuring smooth production when quantities fall below specified lower limits.
Access: From the navigation bar: Inventory → Inventory
Inventory Movements in PIRO Fusion
Inventory movements in PIRO Fusion can occur in various ways, making it easy to track changes in your inventory. These movements are recorded in the “Inventory History” tab, while the summarized values are visible in the “Current Inventory” tab. Below, we outline the different methods by which inventory movements are generated:
- Manual Entry
- Method: Use the “Create New” button on the inventory form.
- Details: The “Add Inventory” page, discussed later in this document, allows you to manually record inventory movements.
- Job Service
- Method: Services can be configured to either add or remove specific item group(s) items from inventory. On each service, we can configure a load (positive) or unload (negative) movement generation. We need to set these (to the groups we want) either in the “Unload JO items on” column (generates outgoing negative movement) or in the “Load JO items on” column. More details will be discussed in the related form documentation.
- Usage: This approach is tailored to individual client needs and workflows.
- Outgoing Consignments
- Method: Fusion generates an outgoing inventory movement when the Outgoing Consignment (OC) status is set to “Sent.”
- Incoming Consignments
- Method: Fusion generates an incoming inventory movement when the Incoming Consignment (IC) status is set to “Received.”
- Purchasing
- Method: While the Purchase Order itself doesn’t create inventory movement, the related Receipt of Goods (RG) generates an incoming movement when its status is set to “Received.”
- Invoice
- Method: Adding an item type to an invoice generates an outgoing movement if the “Generate Inventory Movement” checkbox is checked on the “Add Invoice Item” page.
- Credit Memo
- Method: Similar to invoices, credit memos generate incoming movements if the “Generate Inventory Movement” checkbox is selected on the “Add Credit Memo Item” page.
- Add Item from Inventory
- Method: This button can be found in different forms (JO, SO, etc.) and is used to deduct items from the inventory. The items will only be deducted this way if users check the “Generate inv. movement” checkbox on the Add Item from Inventory screen for the selected inventory items.
- Add to Inventory Button
- Method: Located on the item type detail form, this button allows you to easily add a specific quantity to your inventory.
- Converting Option
- Method: Some Sales Order conversion options deduct items from inventory. For example, the “Pull and Invoice Stock Items” action button on the Sales Orders/Items tab.
- Scanning
- Method: Similar to the “Add Item from Inventory” button, scanning requires users to scan or manually enter the inventory item they wish to add to a specific document.
Tabs Overview
The Inventory module contains specific tabs for organizing and displaying information about inventory movements. These tabs make it easy to access relevant data. Item groups with the “Show on separate tab” flag checked will appear on individual tabs; otherwise, all information is accessible under the “ALL ITEMS” tab. Metal types (e.g., Master Alloys, Pure Metals, and Alloys) may also have dedicated tabs.
There are four main types of tabs:
![]()
- Current Inventory
- Provides an overview of available item types with the “Track item quantity” miscellaneous setting checked.
- Items are grouped according to “Inventory Item Grouping.”
- Displays summed quantities for quick reference.
- Inventory History
- Displays a comprehensive history of all movements related to item and metal types.
- Movements are listed individually, not grouped.
- Useful for tracking complete inventory operation history.
- Incoming Consignment
- Displays movements generated by incoming consignments or memos.
- Helps track inventory additions from consignment transactions.
- Outgoing Consignment
- Displays movements related to outgoing consignments or memos.
- Helps monitor inventory reductions due to consignment transactions.
Filters
To facilitate searching within the inventory, an expandable Filters panel is located above the inventory list. This feature allows you to apply various filters for precise searches. Multiple filters can be applied simultaneously, displaying results matching all selected criteria.
Available Filters
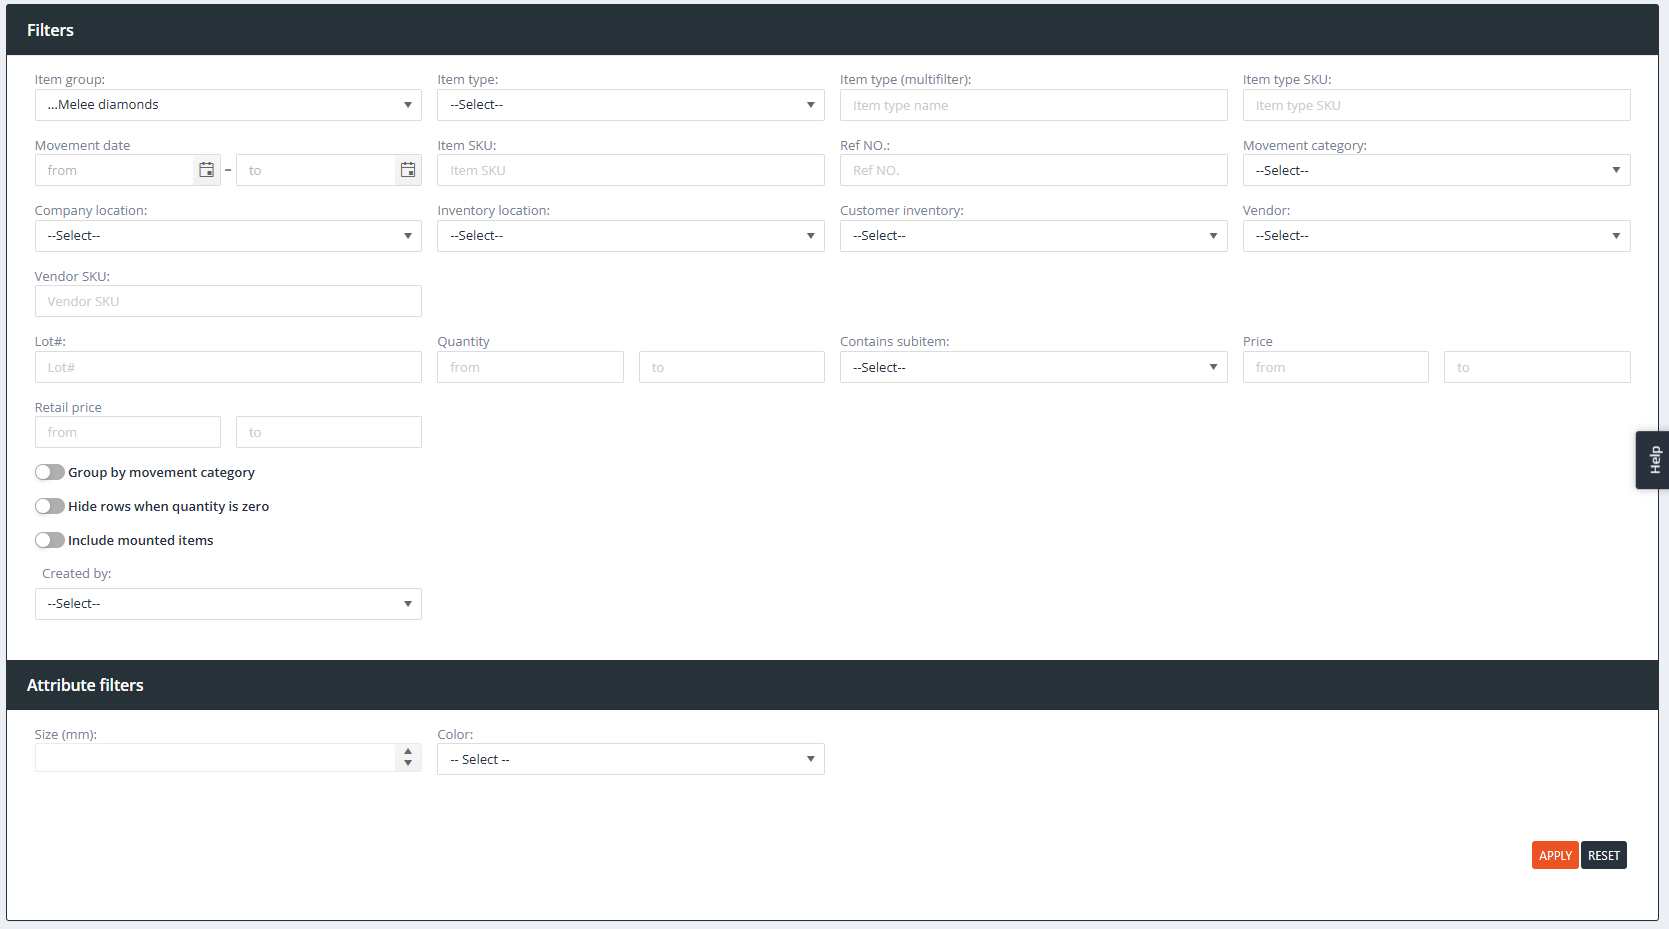
- Item group: Filters by item group.
- Item type: Filters by item type name.
- Item type (multifilter): Filters by item type name or SKU.
- Item type SKU: Filters by item type SKU.
- Movement date: Filters by inventory movement date using date pickers.
- Item SKU: Filters by inventory item SKU (specific to the item, not the item type).
- Ref NO.: Filters by item reference number.
- Movement category: Filters by movement category.
- Inventory location: Filters by inventory item location.
- Company location: Filters by company location.
- Customer inventory: Filters by customer linked to inventory movements.
- Vendor: Filters by vendor linked to inventory movements.
- Vendor SKU: Filters by vendor sku linked to inventory movements.
- Lot#: Filters by item lot number.
- Quantity: Filters by item quantity (range filter with “from” and “to” values).
- Contains subitem: Filters by items containing subitems.
- Price: Filters by item price (range filter with “from” and “to” values).
- Retail price: Filters by item retail price (range filter with “from” and “to” values).
- Created by: Filters by the user who created the inventory movement.
-
Attribute filters: Additional filters based on item group attributes (visible only if an item group is selected either on the item group filter or clicked on the item group’s tab, and that item group has an attribute list assigned with at least one attribute with the “Can be used as filter” attribute setting checked).
Columns
The Inventory Module includes various columns that provide essential information. These columns can be customized per user preference:
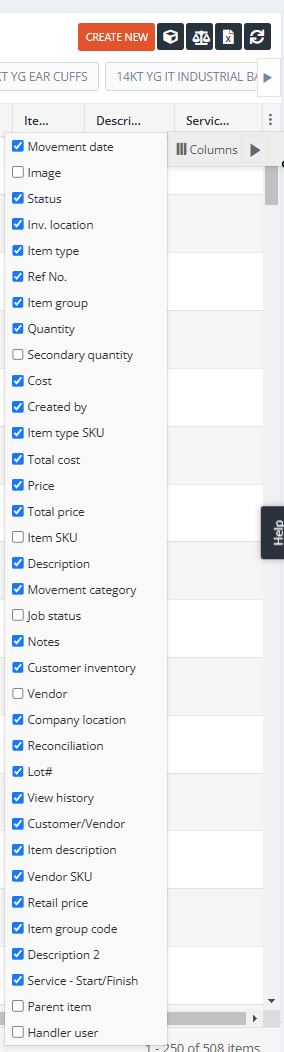
- Visibility: Users can show or hide columns. To show or hide columns, simply click on the three little dots located on the right side of the form. This action will reveal a menu that allows you to toggle the visibility of each column.

- Order: Users can rearrange the column order via drag-and-drop.
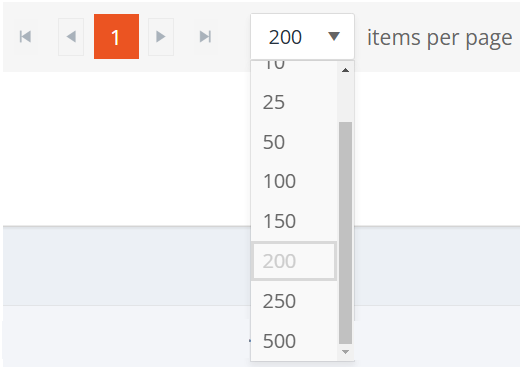
- Pager: Users can set their pager to see the number of rows they wish to see in the list (from 5 to 500).
Customizations are saved individually for each user, enabling a tailored viewing experience.
Available columns can change based on which “Main tab” (Current Inventory / Inventory History / Incoming Consignment / Outgoing Consignment) we’re currently in, and can differ based on the “subtabs” (All Items / Master Alloys / or any other group with the setting “Show on separate tab” enabled). Customizations can be defined for each of these and are saved in the user’s profile.
Note on Loading Speed
The inventory loading speed depends on the number of records displayed (set via the Pager) and the visible columns. Columns that are turned off do not require the system to fetch the associated data, leading to faster loading times. To optimize performance, users are strongly encouraged to turn off columns that are not relevant to their needs.
Column Filters
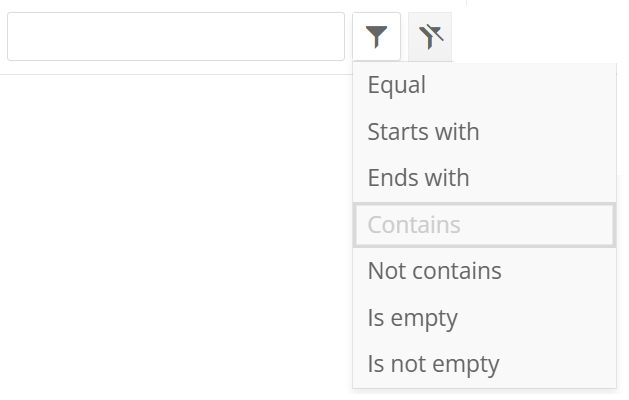
Column Filters are available just like in the Item Type List. These filters allow users to refine their searches by applying specific criteria directly to individual columns. Most columns support filtering, except those where it is not applicable (e.g., the Image column). Each filter includes:
- A text area for inputting the desired text.
- A filter option dropdown next to the text area, offering the following options:
- Equal: Displays rows where the column value matches the input text exactly.
- Starts with: Displays rows where the column value begins with the input text.
- Ends with: Displays rows where the column value ends with the input text.
- Contains: Displays rows where the column value includes the input text.
- Not contains: Displays rows where the column value does not include the input text.
- Is empty: Displays rows where the column value is blank or null.
- Is not empty: Displays rows where the column value is not blank or null.
Inventory Buttons
In the Inventory Module, you’ll find a set of convenient buttons that allow you to perform various actions to manage your inventory effectively.

- Create New
- Purpose: Use this button to manually create inventory movements.
- Action: Clicking this button opens the “Add Inventory Item” page, where you can specify the details of the manual entry.
- Print Tag (Optional)
- Purpose: This button enables you to print predefined specifics onto a label.
- Note: The label printing function is compatible only with customer-specific tags and requires a Zebra Label printer with additional setup.
- Transfer
- Purpose: Click this button to initiate inventory transfers.
- Action: Opens the “Inventory Transfer” form, allowing you to change the location for selected inventory movements.
-
Note: The transfer functionality is visible only if the Admin setting: Inventory / General settings: Companies can have multiple stores/locations is enabled.
- Adjust Inventory (Inventory Reconciliation)
- Purpose: Use this button to adjust current inventory levels for specified item types.
- Action: Opens the Inventory Reconciliation page, where you can make necessary adjustments to your inventory.
- Export List to Excel
- Purpose: Export the inventory list to an Excel file for further analysis or reporting.
- Action:
- If one or more rows are highlighted (checked), only those rows will be exported.
- Only the visible columns will be exported.
- Configuration / Misc Settings / Inventory:
- Export Limit: If this field is set to 0, all inventory items will be exported; otherwise, it sets a limit on how many rows can be exported in one go.
- Export Images: If checked, images will be exported; if not, they won’t (even if the Image column is visible).
- Hide MU for Export: Will not export the Measure Units if checked.
- Hide Currency for Export: By default, all related columns (cost, price, retail price, etc.) will contain the set currency symbols ($, €) to the respective field. If this checkbox is checked, only the amount will be exported.
- Configuration / Misc Settings / Inventory:
- Reload List
- Purpose: Refresh the inventory list to ensure you have the most up-to-date information.
- Action: Clicking this button performs a refresh of the inventory list, updating it with the latest data.
- Note: There is an automatic list refresh after each action.
Add Inventory Item Form
In PIRO Fusion, users can manually generate incoming or outgoing inventory movements by clicking the “Create New” button, which opens the “Add Inventory Item” form. This form allows users to specify the details of the inventory movement they wish to record.
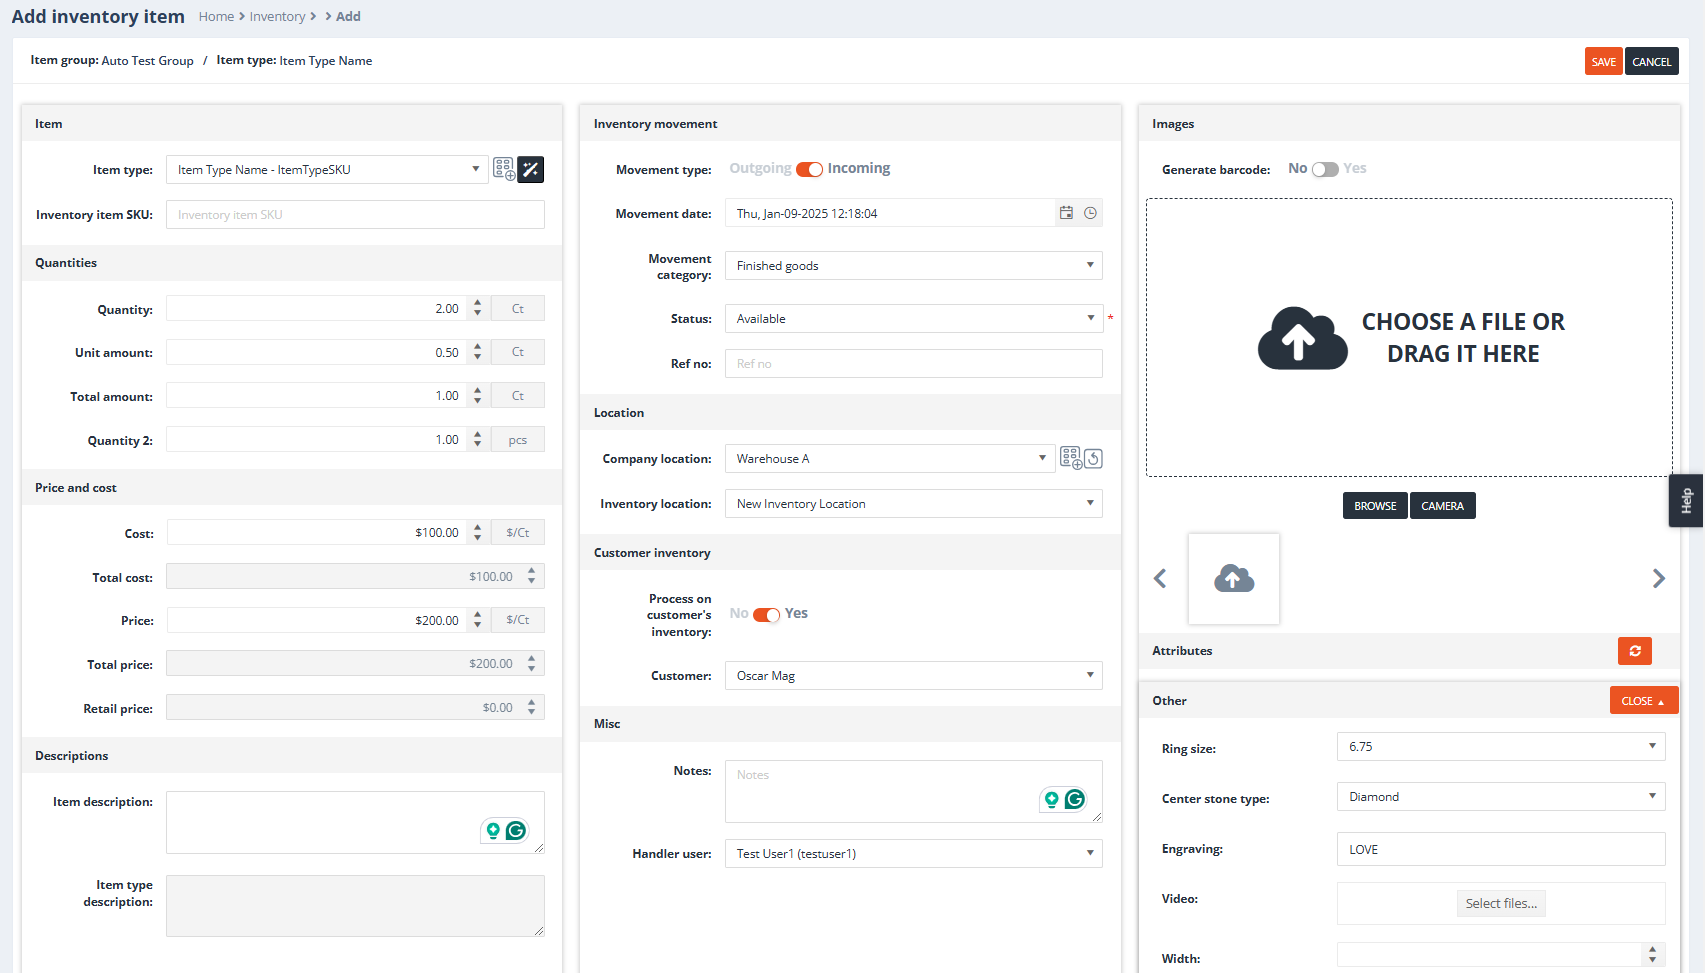
1. Item Area
- Item Type: A dropdown list of available item types.
- Create New Item Type: A button next to the item type selection list that opens the Create Item Type form in a new tab.
- Item Type Wizard: A button next to the item type selection list and the Create New Item Type button that opens the Item Type Wizard in a new tab.
- Inventory Item SKU: Users can define an inventory SKU that is separate from the item type SKU. If the “Item SKU is auto generated” setting is enabled at the item group level, the inventory item SKU will be automatically generated upon saving the item type. Otherwise, the manually entered inventory item SKU will be saved as provided by the user.
2. Quantities Area
- Quantity: Defines the primary quantity of the item.
- Unit Amount: If the “Inventory uses unit amounts” setting is checked for the selected item type’s group, this field will be visible, and users can define the unit amount here.
- Total Amount: Visible only if the item type has a unit amount. Calculates as: Quantity * Unit amount.
- Quantity 2: Visible only if the “Item types have secondary M.U.” setting is enabled.
3. Price and Cost Area
- Cost: The default cost from the item type.
- Total Cost: This field is not editable. It calculates as: Cost * Quantity.
- Price: The default price from the item type.
- Total Price: This field is not editable. It calculates as: Price * Quantity.
- Retail Price: The retail price from the item type level.
4. Descriptions Area
- Item Description: A field where users can define a unique description for the inventory item.
- Item Type Description: This area is not editable and pulls from the item type detail Description field.
5. Inventory Movement Area
- Movement Type: A toggle between Outgoing and Incoming, allowing users to define whether to add (Incoming) or deduct (Outgoing) the specified inventory item.
- Movement Date: A date picker to specify the date of the inventory movement.
- Movement Category: A selection list of available movement categories.
- Status: A dropdown to select from available statuses. Visible only if the movement is Incoming.
- Ref No: Users can define a reference number. If the inventory movement is generated by a document (e.g., JO, Invoice, OC), the system will automatically assign the document number to this field.
6. Location Area
- Company Location: A selection list of available company locations.
- Create Company Location: A button that opens the Add Company Location form in a new tab.
- Inventory Location: A list of available inventory locations.
- If a Company Location is selected, only the related inventory locations will appear.
- If a Company Location is not selected, selecting an Inventory Location will automatically assign the corresponding company location.
7. Customer Inventory Area
- Process on Customer’s Inventory: A Yes/No toggle to assign the inventory movement to a customer’s inventory if needed.
- Customer: Visible only if Process on Customer’s Inventory is set to Yes. Displays a list of available customers.
8. Miscellaneous Area
- Notes: Users can assign notes to this specific inventory movement.
- Handler User: A dropdown to select a user from the user list.
9. Images Area
- Generate Barcode: A Yes/No toggle to specify whether the system should automatically generate a barcode for this specific inventory movement.
- Image:
- If the item type has its own images, they will be defaulted as the inventory movement image.
- Users can override these images or add new ones if no default image is set.
- Adding Images:
- Drag and drop pictures directly into the area.
- Use the Browse button to upload images from the workstation.
- Use the Camera button to capture images directly.
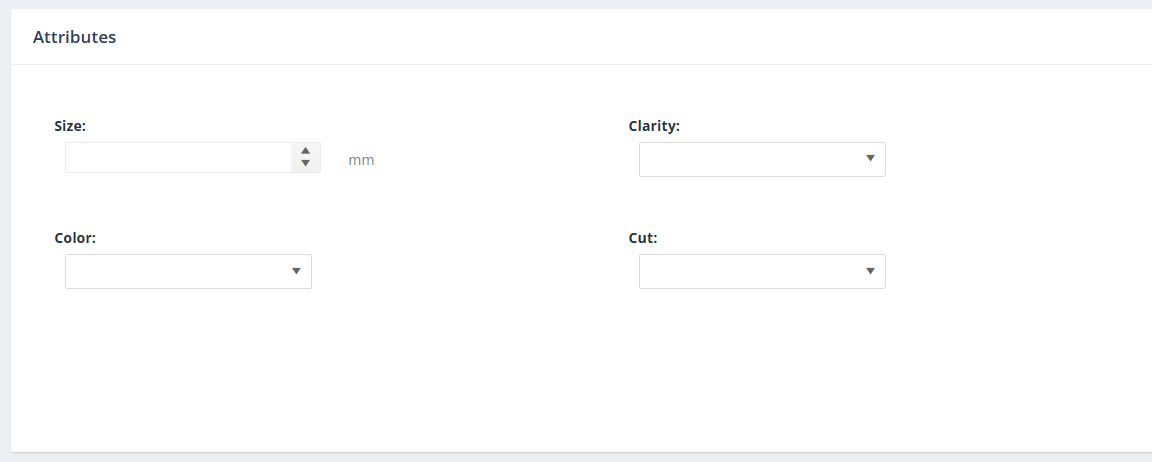
10. Attributes Area
- Attributes List:
- Displays the attribute list of the selected item type.
- If the item type has default attributes assigned, they will be pre-selected.
- Users can modify the attributes at any time to better reflect the specifics of the inventory movement.
- Recalculate Form Data Icon:
- A refresh icon that allows users to force the system to recalculate the Price based on the selected attributes.
- This feature is applicable if the item type is set to attribute-based and attributes are changed on the inventory.
- Note:
- If the attributes are grouped into different groups, users can shrink or expand (Close / Open) each group for better attribute overview.
- This is particularly useful when the item type has many attributes.
11. Subitems Area
- Subitems List:
- Displays the current subitems associated with the loaded item type.
- These subitems can be modified as needed.
Inventory Reconciliation Form
Purpose
The Inventory Reconciliation form allows users to quickly and accurately adjust the available quantities of inventory items. This is particularly useful when the actual inventory levels differ from those recorded in PIRO. By selecting the item types and entering the updated quantities, PIRO automatically generates the necessary inventory movements to align recorded quantities with real-world stock.
Overview of Functionality
- Filtering Inventory Items:
Use filters to specify the inventory items that need adjustment. - Adjusting Quantities:
Update the actual quantities in the designated fields. - Submitting Adjustments:
Submit the changes to generate inventory movements for accurate inventory tracking.
Sections of the Form
1. Select Item Types to Adjust
This section allows users to filter and specify the item types for which inventory quantities need to be updated.
- Filter Options:
- From Picklist:
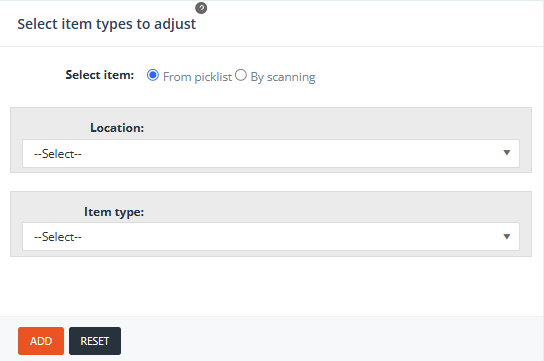
- Filters inventory items based on:
- Inventory Location – a list of inventory locations in the system
- Item Type – the item type list
- Filters inventory items based on:
- By Scanning:
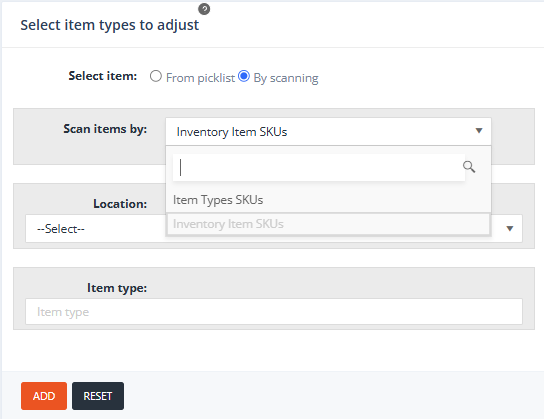
- Provides precise filtering by scanning in the “Item type” field:
- The Item Type’s SKU – First, it needs to be selected in the “Scan items by” list
- The Inventory Item SKU – First, it needs to be selected in the “Scan items by” list
- Further precision can be achieved by selecting the:
- Location – a list of inventory locations in the system
- Provides precise filtering by scanning in the “Item type” field:
- From Picklist:
- Add Button:
Once the filters are set, click the Add button to include all inventory items that meet the specified criteria in the grid at the bottom of the form.
2. Attributes Area
This section displays all the attributes associated with the selected item type(s) from the item type list. It allows users to refine their selection criteria further by defining specific attributes.
Functionality:
- Attribute Filtering:
- Users can define one or more attributes to narrow down the search for inventory items.
- Attributes act as additional filters to ensure that only inventory items matching the specified criteria are added to the Item List when the Add button is clicked.
- Impact on Item List:
- If no attributes are defined, all items matching the general filtering criteria will be added to the Item List.
- If attributes are defined, only the items with matching attributes will be included.
3. Item list

Key Columns in the Item List
- Item Type: Displays the name of the item type.
- Item Type SKU: Shows the SKU of the item type.
- Actual Quantity: Editable field where users can input the actual quantity of the item based on real-world inventory.
- Currently in the System: Displays the current total quantity of the item as recorded in PIRO (same as shown in the “Current Inventory” form).
- Difference: Calculates the difference between Actual Quantity and Currently in the System.
- If the difference is greater than 0, an Incoming (+) inventory movement will be generated.
- If the difference is less than 0, an Outgoing (-) inventory movement will be generated.
- Adjusted Secondary Quantity: Editable field to input the real-world secondary quantity, if the item uses a secondary unit of measure (M.U.).
- Current Secondary Quantity: Displays the secondary quantity currently recorded in PIRO.
- Difference Secondary Quantity: Automatically calculated as the difference between Adjusted Secondary Quantity and Current Secondary Quantity.
- Movement Notes:
- Editable field for notes related to the inventory movement.
- Default value: Inventory adjustment, but users can modify it as needed.
- Movement Ref. No.: Editable field for entering a reference number for the movement.
- Attributes: Displays the attributes of the selected item.
- Cost: Shows the cost associated with the movement.
- Price: Shows the price associated with the movement.
- Location: Displays the location for the inventory movement.
- Item SKU: If the filtered item has its own SKU, it will be displayed here.
- Action: Allows users to remove a row using the Delete (trash-can) icon.
4. Buttons

- Submit Adjustment(s):
- Submits the adjustments made in the Item List Area.
- Action:
- Generates inventory movements for the selected rows, based on the item types and the quantities shown in the Difference column.
- Closes the Inventory Reconciliation Form and redirects the user to the Inventory Form.
- Submit Adjustment(s) and Continue:
- Similar functionality to Submit Adjustment(s), but with a key difference:
- Action:
- Generates inventory movements for the selected rows, based on the quantities in the Difference column.
- Does not redirect to the Inventory Form.
- Clears the added items from the list and keeps the user on the current form for additional adjustments.
- Action:
- Similar functionality to Submit Adjustment(s), but with a key difference:
- Export List to Excel:
- Exports the added item list (including all rows and their details) to an Excel file.
- Cancel:
- Exits the Inventory Reconciliation Form without saving any adjustments and redirects them to the Inventory Form.
Inventory Transfer Form
The Inventory Transfer Form allows users to seamlessly transfer inventory items from one location to another. This process ensures accurate tracking of inventory movements across locations.
Purpose:
- To facilitate transferring inventory items from a source location to a destination location.
- To provide precise filtering and selection of items for transfer using advanced filter options.
1. Source Location Filtering
This section is used to define the source inventory location from which items will be transferred and to filter the inventory items for transfer.
![]()
Filters:
- Company Location: Specify the company location of the source inventory.
- Inventory Location (Mandatory): Specify the source inventory location. This field must be selected to proceed.
- Item Group: Filter inventory items based on their group.
- Item Type: Filter inventory items based on their names.
- Item Type SKU: Refine the list by entering the unique SKU for the item type.
- Item SKU: Further refine the list by entering the unique inventory item SKU.
- Order Code: Filter job order items based on the job order code and selected location.
Actions:
- Define the filters as needed.
- Click the Apply button to add the filtered items to the Source Items grid at the bottom of the form.
2. Destination Location Filtering
This section defines the destination inventory location for the items being transferred and filters inventory items to view or manage at the destination location.
![]()
Filters:
- Company Location: Specify the company location for the destination inventory.
- Inventory Location (Mandatory): Specify the destination inventory location. This field must be selected to proceed.
- Item Group: Filter inventory items at the destination location based on their group.
- Item Type: Filter inventory items at the destination location based on their type.
- Item Type SKU: Refine the list by entering the unique SKU for the item type.
- Item SKU: Refine the list by entering the unique inventory item SKU.
Actions:
- Define the filters as needed.
- Click the Apply button to add the filtered items to the Destination Items grid at the bottom of the form.
3. Source Items Grid
This grid lists the inventory items filtered from the source location that are available for transfer.
![]()
Columns:
- Item Group: Displays the group to which the item belongs.
- Item Name: Shows the name of the item.
- SKU: Displays the item type SKU.
- Item SKU: Shows the unique inventory item SKU (if the item has one).
- Item Description: Displays the description of the item.
- Inventory Location: Specifies the source inventory location of the item.
- Selected: Editable field where users can define the quantities to transfer.
- If left blank, the entire quantity will be transferred to the destination location.
- If an amount is entered, only the specified amount will be transferred.
- Available: Displays the available quantity of the item in the source inventory.
- Total Cost: Reflects the total cost of the item at the source location.
- Total Price: Displays the total price of the item at the source location.
- Attributes: Lists any attributes assigned to the item.
Destination Items Grid
This grid displays the items transferred to the destination location, showing the updated details after transfer.
![]()
Columns:
- Item Group: Displays the group to which the item belongs.
- Item Name: Shows the name of the item.
- SKU: Displays the item type SKU.
- Item SKU: Shows the unique inventory item SKU (if the item has one).
- Item Description: Displays the description of the item.
- Inventory Location: Specifies the destination inventory location of the item.
- Selected: Displays the quantities transferred for the item.
- Available: Reflects the updated quantity available at the destination location.
- Total Cost: Shows the total cost of the item at the destination location.
- Total Price: Displays the total price of the item at the destination location.
- Attributes: Lists any attributes assigned to the item type.
Transferring Items
- Select Items for Transfer:
- Choose rows in the Source Items Grid to transfer by checking the checkbox on the very first column and define quantities in the Selected column.
- If no value is entered in the Selected column, the entire available quantity will be transferred.
- Initiate Transfer:
- Use the Transfer
 button (on the bottom of the form) or the Arrow
  button (between the grids) to move selected rows to the Destination Items Grid.
 - The transfer will respect the quantities specified in the Selected column, or the full quantity if left blank.
- Use the Transfer
- Review Destination Items:
- Confirm the transferred items and their updated quantities in the Destination Items Grid.
Scan Button
- Purpose: Allows users to quickly transfer items by scanning their Item Type SKU.
- Location: Available after both the Source Location and Destination Location filters have been applied.
Quick Scan Inventory Transfer Form
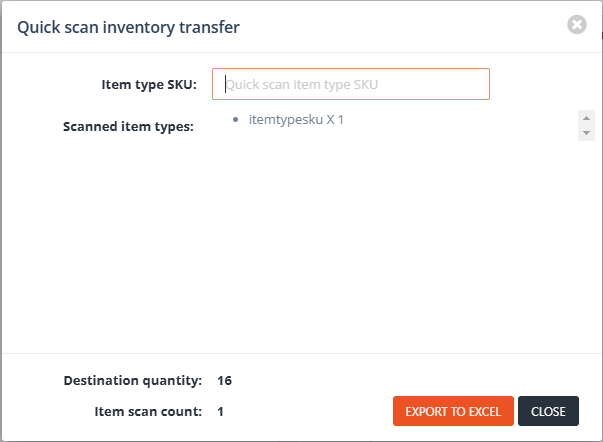
- Access: Opened when the Scan button is clicked.
- Functionality:
- Scan Field:
- Users scan the Item Type SKU in the respective input field.
- If the system finds a matching item in the Source Location (based on filters) with the scanned Item Type SKU, it will automatically transfer 1 quantity of that item to the Destination Location.
- Automatic Transfer:
- The transfer happens in real-time for each scanned SKU, with 1 quantity moved per scan.
- Scan Field:
- Export Scan History:
- Once all desired items have been scanned, users can click the Export to Excel button to generate a detailed scan history.
- The exported file will include a record of all scanned items and their respective transfers.